Touch and
Remote Control Intelligent Safety Dimmer Range Use only on an electricity
supply of 200-250 volts AC
Thank you for choosing VARILIGHT. If you have purchased
a Master Unit and a Slave Unit(s) you can create a 2-
or (multi-) way dimming system (see "Using Master
and Slave Units...." below). This range is designed
to control all incandescent lighting circuits (including
low voltage transformer circuits). For best results
with Low Voltage Lighting use VARILIGHT Low Voltage
Transformers.
Safety Feature: Your dimmer is protected against overload.
If an overload occurs it will automatically turn the
brightness down or turn off until the overload is removed
and the dimmer is switched off and then switched back
on again. If the dimmer receives a total short-circuit
it may cease to function. (In this case return the unit
to our service department at the address below and not
to your supplier. The service department will repair
your dimmer free of charge. See guarantee below)
USES FOR THE SWITCH
Your VARILIGHT intelligent safety dimmer is suitable
for: mains voltage GLS bulbs; mains voltage halogen
bulbs; fans; most electronic transformers (including
those requiring trailing-edge control) and toroidal
transformers. Do not use for fluorescent, compact fluorescent
bulbs or non-toroidal wire-wound transformers. Maximum
load must be reduced by 25% for mains voltage halogen
& candle bulbs.
When using electronic LV transformers add the VA ratings
of the transformers, not the wattage of the bulbs. There
is an absolute maximum of 5 transformers, except with
VARILIGHT LV Transformers when you can add the bulb
wattages up to the dimmer "max. load" with
up to 10 transformers.
Troubleshooting:
These dimmers will run hot when used on a full load
(up to 50ºC). This is within the design parameters
of the switch and is safe. However, if you are unhappy
with this temperature, reduce the load.
When using this dimmer to control low voltage lighting
transformers, choose transformers with a maximum rating
close to their lamp load (eg. Use a 60VA transformer
to control a 50W low voltage bulb); except with VARILIGHT
LV Transformers - any lamp loading will work.
Note: Certain transformers may not behave according
to their power rating when used with a dimmer. An overload
will result in the safety features of this dimmer turning
down the brightness. If so change your transformers
to ones which do not appear as an overload, remove one
(or some) transformer(s) from the circuit or choose
a higher rated dimmer instead. Some wire-wound transformers
may make excessive noise when dimmed. Only one such
transformer can be used per dimmer.
FITTING THE SWITCH
Read the instructions below carefully. In case of any
doubt or difficulty consult a qualified electrician.
1. Switch off at the mains, then remove the
existing switch and disconnect the wiring from the switch
terminals at the rear, taking note of the present wiring
of the switch and the marking on the terminals. Where
there are two or more wires together in the old switch,
they must be kept together in the dimmer.
2. Ensure that any wall box is free of plaster
lumps or projecting screw heads. Dimmers on single-sized
plates can be fitted to wall boxes having 60.3mm screw
fixing centres and those with double-sized plates to
wall boxes with 120.6mm fixing centres. Most models
can be fitted into a box with a minimum depth of 25mm,or
a normal surface mounted switch box. A box having 4
fixing lugs cannot be used without modifying it. The
top and bottom lugs must be broken off or bent flat.
3. To connect the wiring, refer to the diagrams
below. Take care that no bare wires project out of the
terminals.
4. Dimmers having a metal front plate must be
earthed by means of the earthing point on the dimmer.
5. After connecting the wires screw the dimmer
gently into the wall box so that the front plate is
not
distorted or cracked. Do not trap the wiring between
the rear of the dimmer and the back of the wall box.
6. Turn on the mains electricity.
Your VARILIGHT Remote Control and Touch Master Dimmer
is suitable for 1-way circuits.
It can be used for 2-way circuits only if wired as shown
below and using a VARILIGHT slave unit. Intermediate
and multi-way dimming require extra slave units and
suitable wiring. (If you cannot understand the wiring
diagram below call out a qualified electrician.)
In 1-way lighting circuits each
light is controlled by one switch. A Master Dimmer should
replace this switch. The live wire must be connected
to the terminal marked "Liveo" and the "load"
wire to the terminal marked " ". To fit 2
gang (or 3 or 4 gang) dimmers treat each group of terminals
at the back of the unit as a separate dimmer, wiring
them into the lighting circuits as above. You may need
a short length of wire to connect together the "Liveo"
terminals.
Using Master and Slave Units in 2-Way and Intermediate
Circuits
2-way lighting circuits have two switches (intermediate
circuits have 3 or more switches) turning the same lights
on and off from 2 (or more) locations (eg. at the top
and bottom of the stairs). In suitable circuits one of
the switches will have a live wire connected. Replace
this switch with a Master Dimmer and the other switch(es)
with Slave Units to allow dimming from more than one location.
Note: If your 2-way or intermediate circuit does not have
three direct connections between the switches (as in the
diagram) the circuit must be rewired using conventional
"2-way" wire (red, blue, yellow & earth).
Master Dimmer: Connect the live wire to the terminal marked
"Liveo" and the "load" wire to the
terminal marked " ".
Slave Units: Must be wired to the Master unit as follows:
"Liveo" to "Liveo", "S"
to "S" and " " to " ".
OPERATION OF THE SWITCH
If your dimmer does not have a remote control function,
you need only read (a) & (c) below. If you have
purchased a remote 
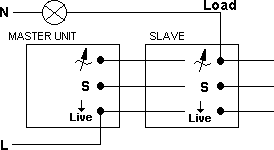
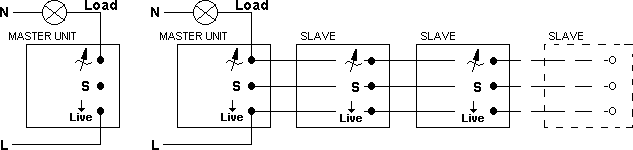
control dimmer read (a), (b) and
(c) below. For slave units (a) applies.
(a) Touch Control
To initialise the dimmer, touch the circular sensor
on the front of the plate once for 2 seconds. The dimmer
will respond by making the light(s) brighter. A single
touch will now turn the light(s) on or off. To dim the
lights, keep contact with the sensor until the desired
light level is reached. While contact with the sensor
is maintained, the brightness will cycle up and down.
To change the direction of the dimming cycle remove
contact and then touch the sensor again. When the brightness
reaches the level you desire, remove contact with the
sensor. If you have a 2- (or multi-) gang model you
need to initialise each sensor in the same way.
(b) Remote Control
This dimmer can also be programmed to respond to any
button on a remote control unit. If there is a button
that you do not currently use on a remote control unit
you already have at home then you can use it to control
the dimmer. Otherwise a dedicated remote control unit
can be purchased to control the dimmer.
The dimmer needs to be taught to recognise the button
on the remote control unit you intend to use. To do
this, follow the instructions below:-
1. To set the dimmer into learning mode, pause
for 60 seconds and then touch the sensor 6 times. The
dimmer will respond by turning the light(s) on and off
3 times. After this the lights will cycle up and down
once and turn off.
2. Choose a spare button on your remote control
unit. Within 15 seconds (and from a distance of about
1 to 2 metres) press and hold down the chosen button
releasing after about 2 seconds. The dimmer will cycle
the light(s) on and off once.
3. To confirm your choice, press and hold down
the same button again releasing after about 2 seconds.
If the programming has been successful, the light(s)
will cycle on and off twice. If this does not happen
then return to step 1 above and try again. If the problem
persists, try a different button, a different remote
control unit or purchase the dedicated VARILIGHT controller.
4. You can now use this button on the remote
control to operate the dimmer. As with the touch sensor,
a single touch on the remote control button will turn
the light(s) on and off. Holding the button down will
make the brightness cycle up and down. To change the
direction of the dimming cycle remove contact and then
press the button again. Release contact from the button
when the desired light level is reached. The dimmer
can still be operated using the touch sensor.
5. For 2- (or multi-) gang models, repeat steps
1 to 4 for each sensor, teaching each one a different
button so you can control each one separately. You can
change your choice of control button by following steps
1 to 4 again at any time.
GUARANTEE
Important: In case of any defect return the dimmer to
our service department. This guarantee is in addition
to and not in derogation of the statutory rights of
the purchaser and is offered so that you may have the
benefit of our technical facilities. Should any defect
occur in this unit within 12 months of its purchase
we will replace or repair the defective unit free of
charge provided that:-
a) The unit has been correctly fitted according to the
instructions and has not been used with fluorescent
bulbs, compact fluorescent bulbs, or overloaded beyond
its rating, and has only been used on 200-250V AC.
b) The dimmer module has not been tampered with or taken
apart.
GUARANTEE REGISTRATION NUMBER 620.
Safety Feature: Your dimmer is protected against overload.
If an overload occurs it will automatically turn the
brightness down or turn off until the overload is removed
and the dimmer is switched off and then switched back
on again.