
LH Heating Elements Under Laminate Flooring Systems
INSTALLATION AND OPERATING INSTRUCTIONS1) Introduction
The LH Heating Element
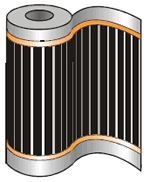 The principle of LH heating elements is based on a continuous
resistive sheet providing heat
The principle of LH heating elements is based on a continuous
resistive sheet providing heat
evenly over the black surface areas.
LH consists of a specially formulated semi-conductive medium, coated
onto polyester film.
Power is fed to this resistive coating by way of
copper conductors that are fixed to the longitudinal edges of the heating
areas. This structure is insulated by a lamination of polyester based
films that totally cover the element and is wider than the conductive
heating area, forming strong clear edges that are designed to accept
subsequent fixing to sub floor surfaces.
Low temperature LH floor heating elements produce a gentle heat that evenly warms the entire room. Once the surfaces have been warmed, the heat is reflected resulting in comfortable, natural warmth with minimum floor to ceiling temperature variation.
 LH heating element is supplied fully prepared, cut to size,
tails fitted and insulated ready for installation. LH heating element
should be installed by a suitably qualified trades-person. It is not a ‘do
it yourself’ product.
LH heating element is supplied fully prepared, cut to size,
tails fitted and insulated ready for installation. LH heating element
should be installed by a suitably qualified trades-person. It is not a ‘do
it yourself’ product.
2) Installation Procedure
Before commencement of installation always check on the following:
a) The building is weather tight, and that the glazing and doors have
been fitted.
b) Any floor screeds, asphalt etc. have been laid and
allowed to dry out.
c) All electrical first fix wiring and other
mechanical services through floors have been completed.
d) No cables
must be allowed to come into contact with the LH heating elements.
e)
All electrical connections must be made in accordance with IEE 16th
edition regulations and
carried out by a suitably qualified
electrician.
3). Planning the Installation
Draw a plan of the floor identifying areas occupied by fixed furniture
such as kitchen cabinets (heating elements should not be installed in
these areas).
Draw the heating elements on to the plan taking the
following points into consideration.
For best value, use a small number of long elements rather than a larger number of short elements (remember element lengths can be reduced on site if necessary).
The narrower LH4 element is often used as the final element in a group
where the LH5 would be too wide.
Whenever possible keep the element
ends fitted with the live and neutral cables along one wall. This should
be the same wall on which the thermostat is mounted.
A minimum gap of 50mm should be maintained between the wall and the edge of the heating element. When a number of elements are being used this distance may need to be increased slightly to allow space for the cables to run to a junction box. Remember that small reductions in length can easily be made on site.
For the most even heat distribution the elements should lay side by side with no gap between them. Double-sided tape may help to hold the elements in place. Small gaps between the elements will not significantly affect the efficiency of the system. It is essential that neither the copper conductors nor the black carbon stripes are allowed to ‘overlap’.
 |
| The finished connection completely covered with protective, hardwearing, moisture resistant plastic casing |
An element can be trimmed in length by cutting carefully width-ways between the black stripes. Trimming the element will expose the ends of the two copper conductors. These exposed ends should be insulated using the green discs provided.
NOTE: Although all LH element is visually inspected at the
factory before dispatch the elements should be checked to ensure any rough
handling has not damaged the LH element. Look for creasing or folding of
the product that could have been caused by a roll of element being trodden
on. Any such damaged areas must be discarded and replaced.
Check that
the connections at the end of the rolls have not been damaged. The
connections should be firm not loose.
4). How to lay the film and connect it to the grid.
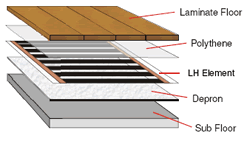
Before laying the film, lay out a 6mm layer of Depron insulation. The edges of the Depron sheets may be taped together to prevent them ‘Riding Up’. Other options for insulation are available such as Marmox. The layer of insulation also acts as sound deadening that is a requirement for laminate floors.
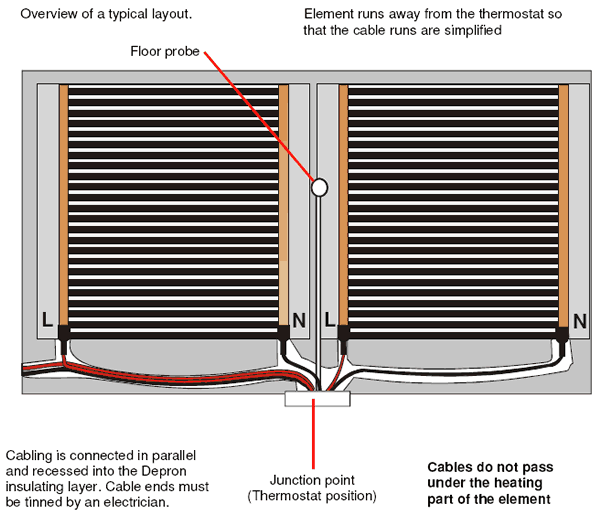
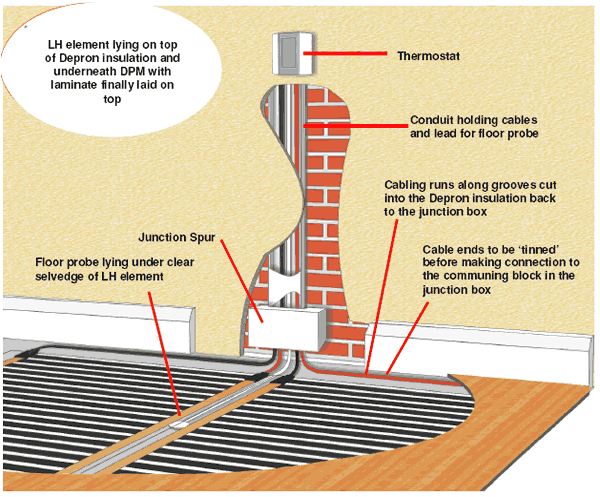
Locate the suitably fused, low level, junction box. Create channels in the Depron insulation to accommodate the return of the cables to the junction box and a channel for the floor probe (floor probe supplied with thermostat). Run the element away from the junction point with the end that the cables are attached to being closest to the junction point.
The floor probe should be positioned in between element strips and should be placed at least 1metre away from the wall. When you have a good idea where the element will be positioned cut a channel in the insulation for the probe to fit into. Never have the probe positioned under the heating part of the element.
Never lay the strips of film in such a way that their heating surfaces overlap or that nonheating cables pass under the element. You can fix the element strips in place using tape.
Note:
Individual cables should be fed back to local low-level
fused spur termination boxes (provided by the electrician) and planned not
to exceed the 10 amp element rating.
For standard under floor heating elements this would be:
| Heated width | 330 mm – 43 Watts/ linear metre – maximum length 53 metres. |
| Heated width | 500 mm 65 Watts/ linear metre – maximum length 35 metres. |
Connection to the junction point should only be carried out by a qualified electrician in accordance with IEE 16th Edition regulations.
Overview of Installation
5). Electrician Requirements
All electrical connections must be made in accordance with IEE 16th Edition regulations by a suitably qualified electrician. A fused spur or combined spur / RCD is recommended.
5a). First Resistance Check
Once all the strips are laid and interconnected check the resistance value of each circuit using an ohmmeter applying the formula :
| 52900 (v²) | = Resistance (ohms) |
| Watts |
If all the circuits are functioning satisfactorily, lay clear
polyethylene film at least 0.2 mm thick upon the
whole floor surface.
The individual strips of polyethylene must overlap by at least 20 cm. This
can be replaced with the laminate floor manufacturers preferred or
recommended covering.
5b). Thermostat
The thermostat should be sited 1.5m from floor level, directly above the element termination box(es) and away from the local heat sources and large windows. A cable must be run from the junction box to the ‘common’ and ‘normally closed’ terminals of the thermostat.
NOTE: Should the total connected load in any area exceed the rating of the controller the electrician should provide a suitable switching contactor (normally located adjacent to the distribution board) with a switching feed to the controller. An option is to fit two controllers, however this may create a temperature imbalance and is generally avoided.
5c). Electrical considerations with reference to wiring from the room thermostat to heating elements.
1.5 mm² double insulated cable must be used for making up wiring harnesses. To satisfy the requirements of an acceptable British Standard sheathed single core cable to BS.6004 would be acceptable.
6). Laying a floating floor.
The laminate floor must be laid according to the manufacturers recommendations. When laying a floor you must take special care not to damage the element and the supply cable. Walking on the LH element must be kept to a minimum. When walking on the element cannot be avoided soft-soled shoes must be worn.
7). Second Resistance Check
Once the laminate floor has been laid check the resistance of the total circuit using an ohmmeter and record the result on the installation record form.
8). Warranty
Assuming correct installation, LH elements will give many years of satisfactory service. In the unlikely event of a malfunction resulting from faulty manufacture, LH is guaranteed for 12 months from date of purchase. The guarantee covers the full purchase price but not the cost of repairing or replacing the elements in the floor. An installation record form is supplied with each set of elements. This should be completed at the time of installation and posted to BN Thermic within 60 days of installation. Warranty claims will not be considered if the form has not been returned to us within the required time.