Programming aid for F10-C controller
This sheet has been produced to assist in the programming
of the F10-C controller. It breaks down the basic features
of the thermostat and is designed to be easy to follow. This
document will help you to:
Set time and day.
Set setback programmes and temperatures.
Switch thermostat off and on.
Note. This document should only be used in conjunction
with the user manual supplied.
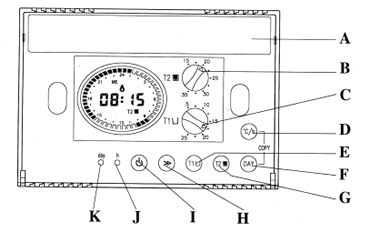
Figure 1.

A Battery cover
B Temperature adjustment for T2 (comfort temperature)
C Temperature adjustment for T1 (setback temperature)
D Time/temperature display button
E Button to assign T1 to selected segment during
programming
F Button to alter day during programming
G Button to assign T2 to selected segment during
programming
H Button to alter setback times during programming
I On/ off button
J Recessed time adjustment button
K Recessed day adjustment button
To set time and day
- Remove battery cover (figure 1. A) and place the batteries
supplied in the top of the thermostat- display reads 00.00
- To set the time. Open the plastic window. Using a pen,
press and hold the small recessed button marked h
(figure 1. J) until the correct time is displayed
(figure 2. C). Release the button
- To set the day. Using a pen, press and release the small
recessed button marked day (figure 1.K) until the
correct day is displayed (figure 2. A). Release the
button.
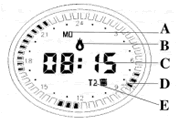
Figure 2.

A Present day display
B Indication that heater is on
C Time or temperature display
D Flashing segment representing present time
E Displays current program (T1 or T2)
To set-up setback facility
The F10-C has 2 temperatures which can be preset, these are
known as T1 (setback temperature) and T2 (comfort
temperature). The most common use for the setback temperature
is through the night when, by setting a very low setback temperature
you can effectively turn the heater off. The F10-C controller
allows you to setup, in 30 minute segments, which of the two
temperatures you want the thermostat to regulate to. The following
example shows the programming of 1 setback between 11.00pm
and 7.00am seven days a week. (If you require more complex
setback programmes please refer to user manual supplied)
- From the normal operation screen, with the time displayed,
open the plastic cover and press the button marked >>
(figure 1. H)
- Display reads prog, also the segment corresponding to
the present time is now flashing, and a day is displayed
(figure 2. A)
- Press and release the button marked day repeatedly until
mo (Monday) is displayed.
- Press and release the button marked >> repeatedly,
until the flashing segment is above the dot representing
23.00hrs.
- Press the button marked T1.
- Press the button marked >> once to move on to the
next 30 minute segment.
- Press the button marked T1.
- Repeat this process until you come to the 30 minute segment
above the dot representing 7.00am. Now instead of pressing
the button marked T1, press T2.
- Repeat this process until all segments are allocated up
to 11.00pm.
- Press the button marked °C/h and the button marked
day at the same time to copy the setback programme
from Monday to Tuesday. Note. mo changes
to tu.
- Repeat this process through all 7 days until mo
is displayed once more.
- Do not press any buttons for approx. 5 seconds, for normal
operation to resume.
Programming setback temperatures
This is the temperature that the thermostat will maintain
during setback operation. To change this, starting from the
normal operation screen, press the button marked T1
(figure 1. E), now turn the dial marked T1 (figure
1. C) and the current set temperature appears on the
screen, turn the dial to adjust (figure 1. A) (temperature
appears on the screen) to the required temperature. Do not
press any buttons for approx. 5 seconds and display reverts
to normal operation screen.
To set comfort temperature
This is the temperature that the thermostat will maintain
when not in a setback programme (in the example given from
7.00am until 11.00pm). To set this, from normal operation
mode, lower the plastic cover. Press the button marked T2
(figure 1. G) and rotate the dial marked T2
(figure 1. B) to the required temperature. Do not press
any buttons for approx. 5 seconds and display reverts to normal
operation screen.
Note. As a guide to setting the comfort temperature,
the 'European norm' is 24°C
To switch the thermostat on/off
From the normal operation mode, lower the plastic cover and
press the button marked with the 'on/off' symbol (figure 1.I).
Display disappears and only the clock is displayed. Now the
thermostat is inactive and setback programmes will not operate.
To turn the thermostat back on, simply press the button marked
with the 'on/off' symbol again.
Note. Once the thermostat is switched back on, the
setback programmes will reactivate.
|