Heat Tape Installation Guide
PGE
This pipe freeze protection cable is comprised of a heating cable, thermostat and power cord and may only be used for freeze protection of metal or plastic water pipes up to 40 mm diameter. Read carefully and follow these instructions for an efficient, economical and safe installation. We recommend you retain these instructions for future reference.
Caution
- The heating cable must not touch, cross or overlap itself at any point. This will cause the heating cable to overheat.
- The heating cable cannot be altered in length. If made shorter, it will overheat and if made longer, it will produce insufficient heat. Any attempt to physically alter the heating cable will void the warranty. Once cut, the heating cable cannot be repaired.
- If the heating cable is stiff (due to cold), FIRST UNCOIL IT and then plug it in for a few minutes until it is warm and pliable before applying it to the pipe. NEVER PLUG IN THE HEATING CABLE WHILE IT IS COILED; this will cause the cable to overheat where it touches itself, and the outer jacketing will melt and then fuse together upon cooling.
- Do not install on pipes that are heated to above 66°C (155°F) such as steam lines; these high temperatures will damage the cable.
- The heating cable must be spaced at least 13mm from any combustible materials (including combustible insulation) to ensure the prevention of fire.
- NEVER use more than 13 mm of fibreglass or polyethylene foam insulation. Overinsulating the heating cable will cause it to overheat. Ensure that insulation is flame retardant type.
- The heating cable must be protected from physical abuse if it is installed in locations where it may get damaged (e.g. chewing by animals, debris from lawnmowers, snow shovelling, falling ice, etc.).
- Do not spiral heating cable; keep the cable straight along the entire length of pipe.
- The heating cable must not be immersed in any liquid.
Cable and Insulation Selection
- Measure pipe length and diameter
- Select the cable closest in size to the pipe length. The cable must be no less than 600 mm shorter than the pipe, and must not be any longer. It is possible to use two cables for one pipe length and these cables may overlap up to 600 mm if placed on opposite sides of the pipe.
- Select the insulation to be applied over the heating cable/pipe. A maximum of 13 mm of insulation may be used. Either foamed or mineral wool insulation may be used. Ensure that foam insulation is flame retardant type.
Installation
- Prepare the pipe
Before applying the heating cable, ensure that the area on and around the pipe is free and clear of sharp edges and combustible materials (to minimize the risk of damage to the cable and adjacent areas).
- Apply aluminium foil to plastic pipe
If you are applying the heating cable to a plastic pipe, we recommend that you first wrap the pipe with aluminum foil before applying the heating cable. The aluminum foil distributes the heat from the heating cable uniformly around the pipe, as aluminum is a better heat conductor than plastic.
- Prepare power supply
For UK installations the two pin plug should be removed. Connection to the mains should be made in accordance with current regulations and by a qualified person. The cable must be earthed.
- Position the thermostat
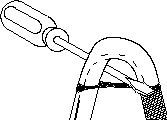
The thermostat (the black cap in the orange block) must be placed tightly against the pipe and secured with PVC electrical tape. Do not use any type of strapping. The thermostat should be placed on the coldest end of the pipe. The thermostat will sense the temperature of the pipe and turn the cable on and off as required to prevent the pipe from freezing and to provide economical operation.
- Apply the heating cable
Using a good quality PVC electrical tape, lay the heating cable on the pipe and fasten it to the pipe at approximately 600 mm intervals.
- Insulate the pipe/heating cable
For pipe freeze protection under extremely cold conditions, or for minimizing energy consump-tion, it is recommended that insulation be added to the pipe over the heating cable. The heating cable/ pipe may be insulated with either fibreglass or polyethylene foam insulation.
INSULATION MUST BE APPLIED TO THE THERMOSTAT IN THE SAME MANNER AS THE REST OF THE HEATING CABLE/PIPE to ensure that all sections of the pipe are maintained at the same temperature. If the thermostat area is insulated moreso than the rest of the pipe, then the rest of the pipe will not be kept as warm as the thermostat area and may freeze. If the thermostat area is not insulated as well as other areas of the pipe, the thermostat will be turning the cable on for longer periods than necessary, resulting in uneconomical operation. (The thermostat turns the heating cable on when it senses temperatures of approximately 3°C or less, and turns the heating cable off when it senses temperatures of approximately 13°C or more).
FOR MINERAL WOOL INSULATION, A MAXIMUM OF 13 mm of insulation may be applied over the heating cable. It is important to note that mineral wool insulation can be damaged by moisture, hence a waterproof overwrap must be applied to the insulation to prevent moisture penetration. FOR FOAMED INSULATION, A MAXIMUM OF 13 mm of insulation may be applied over the heating cable. Foamed insulation is usually not affected by moisture, hence waterproofing is usually not required.
- Connect power at start of cold season
Once the cold/winter season begins, plug the power cord into an appropriate receptacle. (See also “Operation” below)
Operation of Pipe Freeze Protection Cable
- The pipe freeze protection cable contains an automatic thermostat which turns the heating cable on when it senses (falling) temperature of approximately 3°C, and turns the heating cable off when it senses (rising) temperature of approximately 13°C. As a result, the cable does not require any monitoring.
- It is recommended that in summertime, the heating cable be disconnected.
- It is recommended that just prior to the cold/ winter season, the heating cable be inspected for signs of damage and the power supply checked to ensure proper operation. If the heating cable is not damaged and the power supply is operational, then the heating cable may be reconnected.
CCSR Self Regulating Frost Protection Heat Tapes
Caution
- Never connect the heat tape when it is coiled.
- The heat tape must be protected from physical abuse. e.g. chewing by animals, debris thrown from lawnmowers etc.
- CCSR is intended for frost protection and is not designed for use on high temperature process pipes etc.
- CCSR is not suitable for use in hazardous areas.
Installation
- Before applying the heat tape, make sure the area on and around the pipe is free and clear of sharp edges and combustible materials.
- Apply the heat tape to the pipe either straight or evenly spiralled.
- The heat tape should be wrapped around valves, flanges etc., to compensate for the extra heat loss.
- The heat tape can touch and be overlapped if necessary.
- Secure the heat tape with PVC electrical insulating tape at intervals of not less than 300mm.
- Make off ends, tee's and connections using approved termination kits and according to the instructions.
- Insulate overall with fibreglass or similar insulating material, suitably protected from the weather and physical abuse.
- Make sure that the electrical connections are made in accordance with the appropriate regulations and only by a qualified electrician.
- It is advisable to fit an over-riding air thermostat.
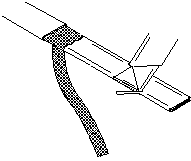
Power Termination
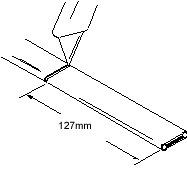
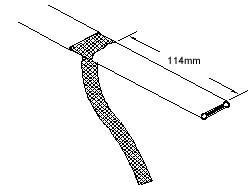
1) Lightly cut around heater overjacket 127mm from the end. Bend cable to break the overjacket.
2) Lightly cut overjacket up the center between first cut mark and the cable end. Bend cable to break the overjacket.
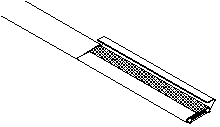
3) Remove overjacket from heater cable.
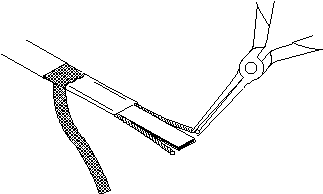
4) Move braid back toward the overjacket, creating a bulge.
5) At the bulge, separate the braid to make an opening.
6) While bending the heater cable, work it through the braid opening.
7) Pull the braid tight.
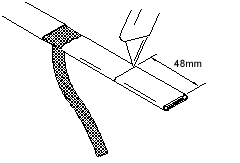
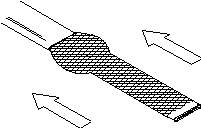
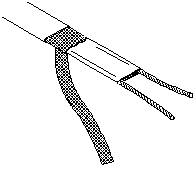
8) Lightly cut around heater outer jacket 48mm from the end. Bend cable to break outer jacket.
9) Lightly cut the outer jacket up the center between the first cut mark & the cable end. Bend cable to break outer jacket.
10) Remove the jacket from the heater cable.
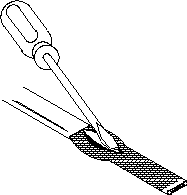
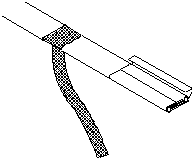
11) Shave the core material from the outside of each bus wire.
12) Starting at the end, pull each bus wire away from the core material.
13) Remove exposed core material.
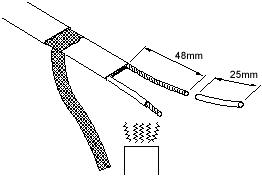
14) Slide one 3mm diameter, 25mm length shrink tube over each bus wire, leaving approximately 13mm of each bus wire exposed. Shrink with heat gun until completely shrunk.
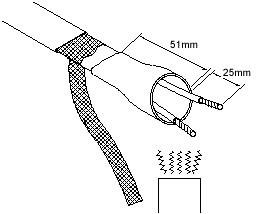
15) Slide a 13mm diameter, 51mm length shrink tube over both pigtail leads leaving approx. 25mm of each pigtail lead exposed. Shrink with heat gun until completely shrunk.

16) While still warm, spread bus wires and squeeze between them using needle-nose pliers, hold for 5 seconds.
End Seal
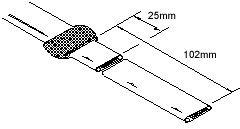
1) Strip overjacket and braid back 102mm from the end. Slide braid back over the overjacket portion of the heater cable.
2) Cut off excess heater cable leaving 25mm.
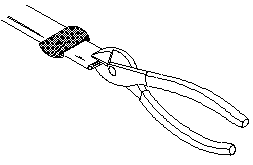
3) At the end of the heater cable, snip a 10mm slit between the bus wires. Slightly spread wires apart.
4) Slide a 13mm diameter, 51mm length shrink tube over the heater cable leaving approximately 25mm of shrink tube past the heater cable. Shrink with heat gun until completely shrunk.
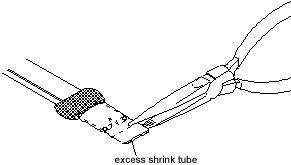
5) While still warm, squeeze the entire width of shrink tube closed. Cut off excess shrink tube.
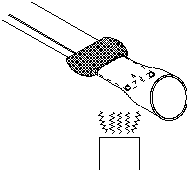
6) Pull braid over the squeezed shrink tube, covering the entire end seal and twist closed.
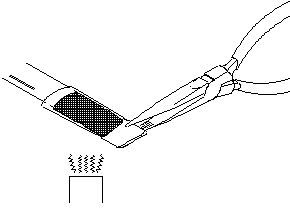
7) Fold twisted braid back and slide the 16mm diameter, 76mm length shrink tube over the braid leaving 13mm of shrink tube past the braid. Shrink with heat gun until completely shrunk.
8) While still warm, squeeze shrink tube closed. Make sure to seal the entire width of tubing.
Selection
Use table 1 to select the correct product. In most instances the cable can be applied in a straight line along the length of the pipe but if an even spiralling is required, this is indicated. The table is based on pipe freeze protection against -20°C.
Table1
| Pipe Diam (mm) | Insulation Thickness | ||
|---|---|---|---|
| 12mm | 25mm | 50mm | |
| 12 | CCSR-10 Straight |
CCSR-10 Straight |
CCSR-10 Straight |
| 25 | CCSR-15 Straight |
CCSR-10 Straight |
CCSR-10 Straight |
| 50 | CCSR-24 Straight |
CCSR-10 Straight |
CCSR-10 Straight |
| 75 | CCSR-24 1.3m cable/1m pipe |
CCSR-24 Straight |
CCSR-10 Straight |
| 100 | CCSR-24 1.8m cable/1m pipe |
CCSR-24 Straight |
CCSR-15 Straight |
| 150 | CCSR-24 3m cable/1m pipe |
CCSR-24 1.4m cable/1m pipe |
CCSR-15 1.2m cable/1m pipe |
Table 2 -
Additional length for flanges, valves and supports (m)
| Pipe Diam. (mm) | Pair of Flanges | Valve | Support |
| 12 | 0.23 | 0.10 | 0.10 |
| 25 | 0.28 | 0.15 | 0.10 |
| 50 | 0.30 | 0.30 | 0.15 |
| 75 | 0.45 | 0.40 | 0.15 |
| 100 | 0.60 | 0.50 | 0.20 |
| 150 | 0.80 | 0.60 | 0.25 |
Example: To frost protect a 75mm diameter pipe 10 metres long. To be fully insulated with 25mm thick insulation. The pipe has 10 supports and the lowest temperature is –20ºC.
1) From the Table 1 cross reference 75mm diameter and 25mm insulation. Select CCSR-24 installed straight along the pipe.
2) Length of cable required is 10m (as cable to be installed straight along the pipe).
3) Add extra length for the support (Table 2) 10 x 0.15 = 1.5m.
4) Total length of cable = 10 + 1.5 = 11.5m of CCSR-24 + 1 CCSR-T 1 termination kit.
Specification
| Ref No | Maximum Output W/M@10°C |
Length | Voltage | Maximum Exposure Temperature (Intermittent) | Minimum Installation Temperature | Maximum Circuit Length |
|---|---|---|---|---|---|---|
| CCSR-10 -CL | 10 | By the metre | 230 | 66 °C | -20 °C | 164m |
| CCSR-10 | 10 | 75m dispensing box | 230 | 66 °C | -20 °C | 164m |
| CCSR-15-CL | 15 | By the metre | 230 | 66 °C | -20 °C | 140m |
| CCSR-15 | 15 | 75m dispensing box | 230 | 66 °C | -20 °C | 140m |
| CCSR-24-CL | 24 | By the metre | 230 | 66 °C | -20 °C | 106m |
| CCSR-24 | 24 | 75m dispensing box | 230 | 66 °C | -20 °C | 106m |
Termination and splice/tee kits available.
For overriding control, internal and external mounting air thermostats available (FST-IN and FST-EX).