DeWalt Power Tools
Pro's Page Author: John English
Choosing a Router
Whether you’re designing a brand new router table or just want to update your existing one, the first concern, of course, is the router itself.
Pro shops like to go with a model that offers at least two collets, one for 1/4" bit shanks and the other for 1/2". Some cabinetmakers prefer to mount a plunge router in their table: their work calls for a lot of dadoes and rabbets that are plowed in two passes, and a plunge router offers faster bit height changing.
I primarily build fine furniture and I favour a fixed-base model that lets me change bits easily and make very accurate micro-adjustments.
A motor in the 1850w range, like the DW625, is essential for large diameter cuts such as raised panels and wide mouldings. Dust collection like the one available on the DW621 is a nice option, too.
Slow-start models let the bit build up to its optimum revolutions before contacting the workpiece, so they deliver a cleaner cut with less wear on the motor.
A router with adjustable speed lets the operator dial slower speeds for large bits, to avoid burning and excessive wear.
Both soft start and variable speed features are available on DEWALT plunge routers.
What Kind of Router Table Do You Need?
A stand-alone cabinet is perhaps the most desirable arrangement for a router table. It provides storage space for extra routers, bits, bases and wrenches, plus it's heavy enough to be stable. Such a unit can be custom built to suit your own height (it should be half as tall as you are), and it can be fitted with casters to make better use of limited shop space.
There are several portable tables available commercially, but their biggest drawback is a small tabletop (a real pain when you're working on a large project). And because they're portable, they're inherently lightweight, so stability can be an issue.
One ingenious option I've always found attractive is a table attached to the underside of an open bench. By mounting it on full-extension, heavy duty drawer slides, it can be pulled out during use and pushed out of the way when the job is done.
My favorite placement option is to build the router table as an extension of the table saw table. This allows me to use the saw's expansive top for support, take advantage of an already installed dust collection system, use the fence system on the saw as a fence for the router, and even employ the saw's miter gauge in certain operations. A router table can easily be added to the DW746 table saw inset boards for the 52" rail system.
Select the Right Stock for the Top
A router table has to be flat, smooth, slick, stable and the right colour. Flat and smooth are obvious, but slick? You must choose a tabletop material that will allow workpieces to slide easily against both the table and the fence, creating the least possible amount of friction. If the action is retarded, each pass will be too slow (which results in burning by the bit), or uneven. This can even be dangerous, as a novice may try to compensate by pushing too hard or too quickly.
The top has to be stable: that is, it must remain flat (without sagging) for several years of use. This can be a challenge on larger tables without center support, so make sure it's thick enough. Your tabletop also should be a light color (preferably white), so the workpiece is easily visible. Many commercial tables are a dark grey or black colour, and stock like walnut tends to visibly merge with this background (especially for old guys like me whose eyes are already questionable!).
The ideal tabletop is a medium density fiberboard (MDF) substrate covered with plastic laminate like Formica™, or a thinner material such as Melamine™. Make sure you cover both faces, to equalize tension and avoid warping. And to make it smooth, sand the top with 400 grit wet/dry paper. The first time you do this, it's a little unnerving to sand brand new laminate!
After sanding, use a tack cloth to clean the top. Then make it slick by rubbing in a coat of clear shoe polish. Buff the shoe polish for an incredibly smooth, slick surface that won't rub off on your unfinished wooden workpieces.
Use Your Saw's Mitre Gauge
Whether you build a separate, free-standing unit or incorporate a new table into the table saw, take advantage of the saw's miter gauge to add versatility to the router. By plowing a groove in the top (shown at left), you can drop the mitre gauge into it (right) and make very accurate crooscuts and end cuts on small stock.

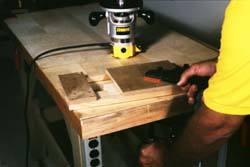
Mounting the Router
There are three ways to mount your router in your new table. You can simply drill three holes and screw the tool's base plate to the underside of the table. Or you can buy and install one of several over-the-counter options (shown below, left photo). But the most satisfying choice is to make your own. The below instructions are ideal for a smaller router. If you plan to mount a larger router, you may want to increase the size of your insert.
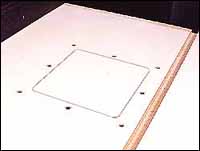
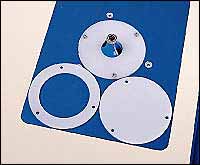
Begin by cutting a 6-1/2" circle in the center of a 12" square piece of tabletop material. This is easily done with a jigsaw or scroll saw. Next, cut an 8" square hole in the top of your table: drill the four corners with a 3/4" Forstner bit, then jigsaw the straight lines.
Center the 12" piece of material under the 8" square hole and screw it in place from underneath the tabletop.
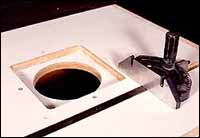
Make an 8" square insert to fit the square hole. Bevel the edges at 5 degrees and sand the corners round to fit. The object here is to make an insert that will simply drop and stay in place, without any screws or fasteners (below, right).
After mounting the router to the bottom of this insert (remove the routers handles to make mounting easier), you should be able to remove and replace the router efortlessly. This makes bit-changing a easy: you never have to fumble around under the table.
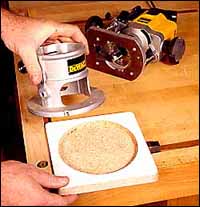
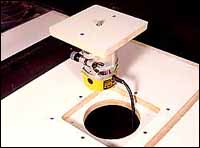
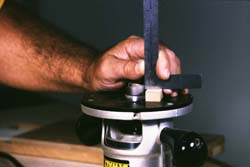
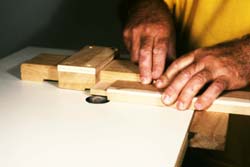
Depending on the amount of travel your router has in its base, you may need to reduce the thickness of the insert. Simply place the router on the underside of the insert, draw its outline, and then use the router and a straight bit to remove about half the thickness of the material (see photo at the top of this page). This is a freehand operation, as the edges don't have to be absolutely perfect because it will be hidden from view.
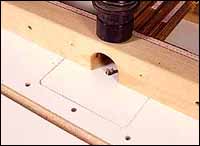
When the router is secured to the insert, place it in the table with a straight bit installed. Turn on the router and slowly plunge the bit through the insert.
Fence Options
There are several options for both shop-built and commercial fences. The most common idea is to make an L-shaped fence that can be attached to the tabletop with a clamp at either end, such as the Woodhaven model shown here (right). Another popular option is to slide the clamps in grooves plowed in the tabletop (shown at left). A third and very simple fence is one that is attached at one end with a pin or bolt that acts as a hinge. The other end is moveable, and is simply secured to the table with a C-clamp. Unfortunately, this latter style precludes the use of a mitre gauge slot.
Sometimes a fence isn't necessary, as when you are routing with a bearing-guided bit. In this instance, it's a good idea to install a starting pin in your tabletop. This is usually made of steel or aluminium, and it's about 1/4"-3/8" in diameter and perhaps 1" long. It can be fashioned by cutting the head and threads off a bolt, or it can be purchased through woodshop catalogues. Drill a 1/2" deep hole in the tabletop about 4" from the bit, to install the pin.
Dust Collection
Even if your router has built-in dust collection, adding a vacuum port to the fence is a good idea. Lower dust levels provide a safer, more accurate work environment.
Most shop vacuum and dust collector manufacturers supply ports that can be attached to a fence. These are generally just screwed in place. In the event that you can't find a port, try using a hose-to-hose connector such as the one shown at right. This connector was designed to connect a large hose to a smaller one. We simply drilled a hole in the fence that was exactly the same diameter as the smaller hose. The hole right above the bit for virtually dust-free routering, and if the connector is a friction fit it can be removed in an instant.
One nice option currently available from woodworking cataloguess is an ON/OFF switch for a router that simultaneously turns on the dust collection device. The second outlet (for the collector) is a slow start affair that prevents circuit breakers from tripping too soon.
Cutting Tenons with the Router
Pro's Page Author: Bill Hylton
Most woodworkers know that the router is an excellent tool for cutting mortises, but how many realize it is great for cutting tenons as well.
A good tenon has straight, square shoulders and smooth cheeks. Smooth surfaces glue best, so you want smooth cheeks on your tenons. Gaps and misalignments at the shoulder not only degrade the joint’s appearance, they weaken it. You want a clean and square intersection of the shoulder and the cheek—no ridges of waste, which could prevent the joint from closing completely. Also, the shoulders must be in the same plane all the way around the workpiece, so they seat tight against the mortise’s shoulders.
Router-cut tenons match the criteria. And they are easy to make. I’ve got two approaches to routing tenons—one for hand-held work, one for the router table. (I might add, parenthetically, that these are great approaches for cutting half-laps too.) For either, a simple-to-make jig, a sharp bit, and a good router are all you need.
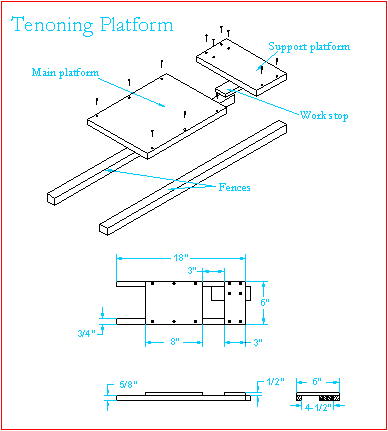
Tenoning Platform
Cut tenons quickly and accurately with a tenoning platform, your DW610 router, and a mortising bit with a shank-mounted bearing
The tenoning platform is very simple to make and use. Lay it on top of the workpiece, clamp it and the work to the benchtop, and rout.
Use a bit that has a bearing mounted on the shank. For several reasons, I use a type of bit called a dado-and-planer, mortising, or bottom-cleaning bit.
It is designed to cut on the horizontal surface as well as the vertical. The tenon’s shoulders thus are square to the cheeks, and both surfaces are smooth, perfect for a good glue bond.
It is short, typically with 1/2-in.-long cutting edges, so it’s easy to make a 1/8 in. deep cut and still have the shank-mounted bearing riding on the platform edge.
It is available in large diameters (up to 1 1/2 in.), so you can cut a typical tenon’s cheek in a single pass.
The bit can be run safely at the router’s full speed.
The jig itself is simple: two square flat platforms screwed to two straight fences. Because the bit’s bearing rides along its edge during the cut, the larger platform must be dead square and must be square to the fences. The smaller platform is simply a secondary support for the router and an attachment point for the stop. The parts are small, so you can use scraps of hardwood for the fences and either plywood or MDF for the platforms.
Learn How To Make the Platform
Here’s how to cut a tenon with the platform, step by step:
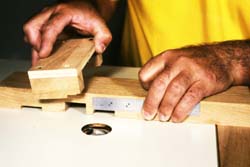
1. Place the stop
Lay out one shoulder of the desired tenon. Put the platform over the workpiece, align the platform edge on the shoulder line, and clamp the jig to the workpiece. Butt a scrap against the end of the workpiece , clamp it to the support platform, and drive a couple of screws through the platform into the stop.
2. Set up the router
Use a fixed-base router. If all you have is a plunge router, treat it like a fixed-base router. Set the cutting depth and lock it. If you do use the plunge feature, you are almost sure to accidentally cut into the platform itself, ruining both the jig and the workpiece.
Chuck a large diameter (1 to 1 1/2 in.) mortising or bottom-cleaning bit with a shank-mounted bearing in your router. A bit with a 1/2-in. shank is best.
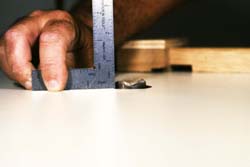
Adjust the cutting depth. You can easily measure the distance the bit extends past the baseplate, but it may be more accurate to use a scrap of the platform material with your small rule. This is especially true if you used plywood for the platform. With the router unplugged, lay a scrap of the platform material on the baseplate next to the bit. Stand the ruler on the scrap and measure the amount you want to cut.
Make sure the bearing will contact the edge of the platform.
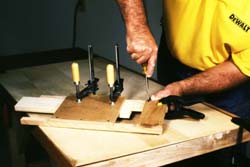
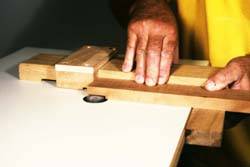
3. Clamp the platform on the work.
Use two clamps to secure the platform on the work, and both to the workbench.Lay the jig over the work, with the stop tight against the end of the workpiece. The workpiece must be tight against the jig’s fence. Clamp the jig and the work to the workbench, placing at least two clamps where they won’t interfere with the router’s movement.
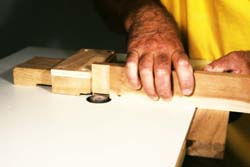
4. Rout the first cheek.
Set the router on the tenoning platform, with the bit clear of both the jig and the workpiece, but with the bearing against the platform edge. Switch on the router, and make the cut. The fence backs up the cut, so you don’t get tearout. You will cut the fence, of course, and the tip of the stop as well; this is of little consequence. The bearing will prevent you from cutting into either the main or the support platform. Depending on the tenon length and the bit diameter, you may be able to cut the cheek in a single quick pass.
Switch off the router, but wait until the bit stops spinning before lifting the router. You don’t want to inadvertently nick the edge of the platform.
5. Rout the second cheek.
Remove the clamps and the tenoning platform. Turn the workpiece over. Replace the platform, positioning it just as you did for the first cut. Reclamp it. Make another cut, just as you did the first.
6. Fit the tenon to the mortise.
With the cheeks cut, you can check how the tenon fits your mortise. It won’t fit it all the way in, because you haven’t done the edges yet. But you will be able to determine if the tenon is the right thickness.
Too thin? Reduce the cutting depth slightly. (And start with a new workpiece.)
Too thick? Increase the cutting depth. (And cut your workpiece again.)
Just remember that you will be cutting both cheeks, so the impact of any cut-depth change will be doubled. If your tenon is 1/16 in. too thick, for example, increase the cut depth only 1/32 in.
7. Rout the edges.
To cut the edges, you stand the work on edge, then balance the platform on it while you apply the clamps. Because you seldom cut just one tenon, a good procedure is to cut the broad cheeks on all the tenons, then gang the pieces together and do the edges. You can gang as many pieces as will fit in the jig.
Once the work and jig are clamped, set the router in place, switch it on, and make the cut. Unclamp, remove the jig, turn the work over, reclamp, and rout the second edge.
Tenoning Sled for the Router Table

You use the same sort of router bit (but you don’t need the shank-mounted bearing). Guide the work with an easy-to-make sled that’s nothing more than a short, stocky T-square. The fence rides along the tabletop edge, so you get a straight, consistently placed shoulder cut. The fence holds the workpiece and backs up the cut, so you don’t get tearout. A work stop clamped to the fence sets the tenon length.
Here—step-by-step, is how I set up and cut a tenon.
-
Measure from the edge of the cut in the fence to set the stop position for your tenon.
Set up the router table. Chuck the bit—the same type used with the tenoning platform—in the router, and set the bit elevation. Use a small rule to measure the exposure of the cutting edge. Set the bit a little under, so you can creep up on the just-right setting through test cuts. (The just-right setting is determined, of course, by fitting a test tenon in a mortise.)
-
The work rides directly on the tabletop, so it is the reference surface for setting the bit extension.
Set up the sled. Use your small rule to set the stop next. Measure from the cut made by the bit into the fence. If the tenon is to be 1 inch long, for example, align the 1-inch mark on the rule over the edge of the cut. Slip the stop onto the fence, and bring it against the end of the rule. Tighten its clamp.
-
Cut a test tenon. Turn on the router and make a pass, cutting the first cheek and shoulder. Roll the workpiece over. Make a pass, cutting the second cheek and shoulder.
Check the fit of this tenon in your mortise. Raise or lower the bit, as necessary, to refine the fit. Cut another test tenon and fit it to the mortise. When you've got the settings right, cut the real work.
-
Cut the real tenons. Work and roll is the routine. With the workpiece in the tenoning sled, its end against the stop, make a pass, cutting the broad cheek. Pull the sled back, roll the workpiece onto its edge, and make another pass. Two more quarter-rolls and two more passes complete the tenon. If the tenon’s length exceeds the diameter of the bit you are using, you simply need to make additional passes with the workpiece pulled away from the stop.
Obviously, "plain vanilla" tenons, which have the same width of shoulder all around, are the easiest to cut. An offset tenon takes two setups. This approach will produce excellent half-laps.
Begin your cut with the work tight against the fence, its' end butted to the stop.
Turn your work into the edge for the second cut. Keep it against both the fence and the stop.
Roll the work a quarter turn after each cut, completing the tenon in four passes.
Making a Tenoning Platform
The tenoning platform is simple to make, and you will be able to screw one together in just a few minutes.
It is so easy to make, in fact, that you may just toss it after a job is completed. Next tenoning job, you’ll just make a new one. You can easily tailor the jig to a special job. Make it wide enough to accommodate two workpieces, for example.
-
Cut the parts.
Five parts is all you need, and you will probably find the stock for them in your scrap collection. The parts aren’t big, and they don’t need to look good.
The two platforms must be flat, and it is a whole lot easier to assemble the jig if they also are square. I favour MDF for these jigs because it has a good edge. It is crisp, free of voids, and won’t develop washboard ripples after a few passes.
The fences must be straight. They should be slightly thinner than the stock you are going to cut tenons on. By making the fences thinner than the working stock, you ensure that the platform rests on the work, not the fences.
The work stop should be no thicker than the fences. Its end must be square.
-
Screw the platforms to the fence.
Getting the main platform joined to the fence at a perfect right angle is the most critical part of the entire procedure. Align the platform edge flush with the edge of a fence piece. Drill a countersunk pilot hole, and drive a screw, setting its head below the platform surface. Then use a square to set the guiding edge of the platform at right angles to the fence, pivoting the pieces on that first screw as necessary. Clamp the parts together when they are perfectly square. Drive two more screws.
Mount the platform to the second fence in the same way.
Position and attach the support platform next. An easy way to set it is to butt a 3-in.-wide scrap against the main platform and set the support platform against the scrap’s parallel edge. Flush up the ends, and screw the platform in place.
Sand the edges around the screwheads, to ensure the entire surface is flat. Dust it, and apply paste wax to the platforms.
-
Mount the stop.
This is usually job-specific. You lay out one shoulder of the tenon you want to cut, then clamp the marked piece in the jig, with the main platform’s edge dead on the layout line. Putt the stop against the end of the work and drill pilot holes and drive two screw through the support platform into the stop.
Now the tenoning platform is ready for use.
Cutting List
| Part Qty | Dimensions | Material | |
|---|---|---|---|
| Fence | 2 | 5/8 in. x 3/4 in. x 18 in. | hardwood |
| Main platform | 1 | 1/2 in. x 6 in. x 8 in. | MDF |
| Support platform | 1 | 1/2 in. x 6 in. x 3 in. | MDF |
| Work stop | 1 | 5/8 in. x 2 in. x 6 in. | hardwood |
Hardware
| Part Qty | Dimensions | Material | |
|---|---|---|---|
| Drywall screws | 12 | 1 in. |