|
Author:
John English
Discover how to make a custom router
table insert below... |
A stand-alone
cabinet is perhaps the most desirable arrangement for a router
table. It provides storage space for extra routers, bits,
bases and wrenches, plus it's heavy enough to be stable. Such
a unit can be custom built to suit your own height (it should
be half as tall as you are), and it can be fitted with casters
to make better use of limited shop space.
There
are several portable tables available commercially, but their
biggest drawback is a small tabletop (a real pain when you're
working on a large project). And because they're portable,
they're inherently lightweight, so stability can be an issue.
One ingenious
option I've always found attractive is a table attached to
the underside of an open bench. By mounting it on full-extension,
heavy duty drawer slides, it can be pulled out during use
and pushed out of the way when the job is done.
My
favorite placement option is to build the router table as
an extension of the table saw table. This allows me to use
the saw's expansive top for support, take advantage of an
already installed dust collection system, use the fence system
on the saw as a fence for the router, and even employ the
saw's miter gauge in certain operations. A router table can
easily be added to the DW746 table saw inset boards for the
52" rail system.
Select
the Right Stock for the Top
Plastic laminate is an ideal surface
for router tables, and light colours are very desirable
as they make the workpiece more visible. They also allow
you to make pencil marks indicating start and stop positions
for cuts. Shown here is a white laminate top with a new
insert waiting for a router. |
A router
table has to be flat, smooth, slick, stable and the right
colour. Flat and smooth are obvious, but slick? You must choose
a tabletop material that will allow workpieces to slide easily
against both the table and the fence, creating the least possible
amount of friction. If the action is retarded, each pass will
be too slow (which results in burning by the bit), or uneven.
This can even be dangerous, as a novice may try to compensate
by pushing too hard or too quickly.
The top
has to be stable: that is, it must remain flat (without sagging)
for several years of use. This can be a challenge on larger
tables without center support, so make sure it's thick enough.
Your tabletop also should be a light color (preferably white),
so the workpiece is easily visible. Many commercial tables
are a dark grey or black colour, and stock like walnut tends
to visibly merge with this background (especially for old
guys like me whose eyes are already questionable!).
The
ideal tabletop is a medium density fiberboard (MDF) substrate
covered with plastic laminate like Formica, or a thinner
material such as Melamine. Make sure you cover both faces,
to equalize tension and avoid warping. And to make it smooth,
sand the top with 400 grit wet/dry paper. The first time you
do this, it's a little unnerving to sand brand new laminate!
After
sanding, use a tack cloth to clean the top. Then make it slick
by rubbing in a coat of clear shoe polish. Buff the shoe polish
for an incredibly smooth, slick surface that won't rub off
on your unfinished wooden workpieces.
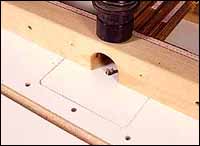
Use
Your Saw's Mitre Gauge
Whether
you build a separate, free-standing unit or incorporate a
new table into the table saw, take advantage of the saw's
miter gauge to add versatility to the router. By plowing a
groove in the top (shown at left), you can drop the mitre
gauge into it (right) and make very accurate crooscuts and
end cuts on small stock.
Mounting
the Router
There
are three ways to mount your router in your new table. You
can simply drill three holes and screw the tool's base plate
to the underside of the table. Or you can buy and install
one of several over-the-counter options (shown below, left
photo). But the most satisfying choice is to make your own.
The below instructions are ideal for a smaller router. If
you plan to mount a larger router, you may want to increase
the size of your insert.
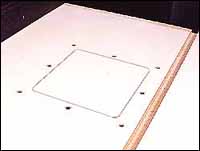
Begin
by cutting a 6-1/2" circle in the center of a 12" square piece
of tabletop material. This is easily done with a jigsaw or
scroll saw. Next, cut an 8" square hole in the top of your
table: drill the four corners with a 3/4" Forstner bit, then
jigsaw the straight lines.
Center
the 12" piece of material under the 8" square hole and screw
it in place from underneath the tabletop.
Make
an 8" square insert to fit the square hole. Bevel the edges
at 5 degrees and sand the corners round to fit. The object
here is to make an insert that will simply drop and stay in
place, without any screws or fasteners (below, right).
After
mounting the router to the bottom of this insert (remove the
routers handles to make mounting easier), you should be able
to remove and replace the router efortlessly. This makes bit-changing
a easy: you never have to fumble around under the table.
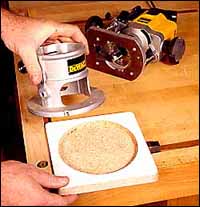
Depending
on the amount of travel your router has in its base, you may
need to reduce the thickness of the insert. Simply place the
router on the underside of the insert, draw its outline, and
then use the router and a straight bit to remove about half
the thickness of the material (see photo at the top of this
page). This is a freehand operation, as the edges don't have
to be absolutely perfect because it will be hidden from view.
When
the router is secured to the insert, place it in the table
with a straight bit installed. Turn on the router and slowly
plunge the bit through the insert.
Fence
Options
There
are several options for both shop-built and commercial fences.
The most common idea is to make an L-shaped fence that can
be attached to the tabletop with a clamp at either end, such
as the Woodhaven model shown here (right). Another popular
option is to slide the clamps in grooves plowed in the tabletop
(shown at left). A third and very simple fence is one that
is attached at one end with a pin or bolt that acts as a hinge.
The other end is moveable, and is simply secured to the table
with a C-clamp. Unfortunately, this latter style precludes
the use of a mitre gauge slot.
Sometimes
a fence isn't necessary, as when you are routing with a bearing-guided
bit. In this instance, it's a good idea to install a starting
pin in your tabletop. This is usually made of steel or aluminium,
and it's about 1/4"-3/8" in diameter and perhaps 1" long.
It can be fashioned by cutting the head and threads off a
bolt, or it can be purchased through woodshop catalogues.
Drill a 1/2" deep hole in the tabletop about 4" from the bit,
to install the pin.
Dust
Collection
 Even
if your router has built-in dust collection, adding a vacuum
port to the fence is a good idea. Lower dust levels provide
a safer, more accurate work environment. Even
if your router has built-in dust collection, adding a vacuum
port to the fence is a good idea. Lower dust levels provide
a safer, more accurate work environment.
Most
shop vacuum and dust collector manufacturers supply ports
that can be attached to a fence. These are generally just
screwed in place. In the event that you can't find a port,
try using a hose-to-hose connector such as the one shown at
right. This connector was designed to connect a large hose
to a smaller one. We simply drilled a hole in the fence that
was exactly the same diameter as the smaller hose. The hole
right above the bit for virtually dust-free routering, and
if the connector is a friction fit it can be removed in an
instant.
One nice
option currently available from woodworking cataloguess is
an ON/OFF switch for a router that simultaneously turns on
the dust collection device. The second outlet (for the collector)
is a slow start affair that prevents circuit breakers from
tripping too soon.
Return to
Top
|