|
Pretty
it isn’t. Functional it is.
You make it from
a few scraps of wood, a carriage bolt, t-nut, and screws.
The wood doesn’t need to be prime in appearance, though
it is always sensible to use stable, straight-grained stock.
You probably can get all the wood from your collection of
off-cuts. Assemble it with care, because
- the
fence must be square to the shoe
- the
edge of the fence must be square to the tabletop.
- the
working end of the stop must be square to the fence
and
square to the tabletop
If you get
anything other than a perfect right angle at any of these
spots, you’ll get tenons with shoulders that don’t
quite line up.
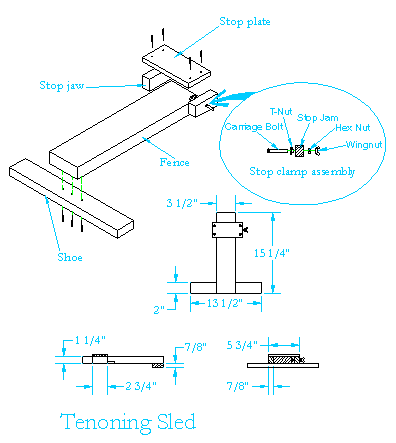
The
parts dimensions listed are for the sled I use on my router
table, which has the router positioned so the bit is 8 inches
from the table’s front edge. If your table has the router
farther back, just make the fence long enough to extend about
4 inches beyond the bit.
1.
Cut the sled and stop parts.
In selecting and preparing the hardwood
parts, be sure to joint and plane these pieces square and
true, with parallel edges and faces. The particular wood you
use isn't that significant. I used oak for the fence, a piece
of cherry for the shoe. What is important is the how accurately
you prep the stock and assemble the parts.
2. Screw
the shoe to the fence.
Position the shoe perpendicular to the fence, and drive screws
through it into the fence. (I didn't glue the fence, but you
can. ) Drive one screw, then check the parts with a square,
pivoting the shoe on the screw if necessary to align it. Then
holding the alignment, drive another screw or two.
4.
Assemble the stop. Drill
a clearance hole through one stop jaw for the T-nut. Drive
the T-nut into the hole. Turn the carriage bolt into the T-nut.
Now glue and screw the stop plate to the two stop jaws. Finally,
turn the hex nut and the wingnut onto the bolt. Jam the two
together to keep the knob from unthreading.
| Cutting
List |
| |
Part
Qty |
Dimensions |
Material |
| Shoe |
1 |
7/8
in. x 2 in. x 13-1/2 in. |
hardwood |
| Fence
|
1
|
1-1/4
in. x 3-1/2 in. x 15-1/4 in. |
hardwood |
| Stop
plate |
1
|
1/2
in. x 2-3/4 in. x 5-3/4 in. |
birch
plywood |
|
Stop
jaws
|
2 |
3/4
in. x 1 in. x 3 in. |
hardwood |
| |
| Hardware |
| |
Part
Qty |
Dimensions |
| Drywall
screws |
3 |
1-5/8
in. # 6 |
| Drywall
screws |
4 |
1
in. # 6 |
| T-nut, |
1 |
1/4
in. |
| Carriage
bolt |
1 |
1/4
in |
| |
3 |
2-1/2
in |
| Hex
nut |
1 |
1/4
in. |
|
Wingnut
|
1 |
1/4 in.
|
Return to
Top
|