| |
Author:
Bill Hylton
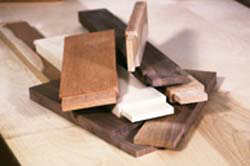 |
| Router-cut
tenons (and half-laps) have crisp shoulders and
smooth cheeks |
Most
woodworkers know that the router is an excellent tool
for cutting mortises, but how many realize it is great
for cutting tenons as well.
A
good tenon has straight, square shoulders and smooth
cheeks. Smooth surfaces glue best, so you want smooth
cheeks on your tenons. Gaps and misalignments at the
shoulder not only degrade the joints appearance, they
weaken it. You want a clean and square intersection
of the shoulder and the cheekno ridges of waste, which
could prevent the joint from closing completely. Also,
the shoulders must be in the same plane all the way
around the workpiece, so they seat tight against the
mortises shoulders.
Router-cut
tenons match the criteria. And they are easy to make.
Ive got two approaches to routing tenonsone for hand-held
work, one for the router table. (I might add, parenthetically,
that these are great approaches for cutting half-laps
too.) For either, a simple-to-make jig, a sharp bit,
and a good router are all you need.
Tenoning
Platform
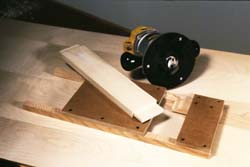 |
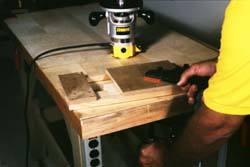
| Cut tenons quickly and accurately
with a tenoning platform, your DW610 router, and
a mortising bit with a shank-mounted bearing |
The
tenoning platform is very simple to make and use. For
plans click here. Lay it on top of
the workpiece, clamp it and the work to the benchtop,
and rout.
Use
a bit that has a bearing mounted on the shank. For several
reasons, I use a type of bit called a dado-and-planer,
mortising, or bottom-cleaning bit.
- It
is designed to cut on the horizontal surface as well
as the vertical. The tenons shoulders thus are square
to the cheeks, and both surfaces are smooth, perfect
for a good glue bond.
- It
is short, typically with 1/2-in.-long cutting edges,
so its easy to make a 1/8 in. deep cut and still
have the shank-mounted bearing riding on the platform
edge.
- It
is available in large diameters (up to 1 1/2 in.),
so you can cut a typical tenons cheek in a single
pass.
- The
bit can be run safely at the routers full speed.
The
jig itself is simple: two square flat platforms screwed
to two straight fences. Because the bits bearing rides
along its edge during the cut, the larger platform must
be dead square and must be square to the fences. The
smaller platform is simply a secondary support for the
router and an attachment point for the stop. The parts
are small, so you can use scraps of hardwood for the
fences and either plywood or MDF for the platforms.
Learn
How To Make the Platform
 |
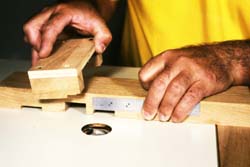
| Produce
square shoulders all around the work piece by screwing
a stop to the platform's auxiliary deck. |
Heres
how to cut a tenon with the platform, step by step:
1.
Place the stop.
Lay
out one shoulder of the desired tenon. Put the platform
over the workpiece, align the platform edge on the shoulder
line, and clamp the jig to the workpiece. Butt a scrap
against the end of the workpiece , clamp it to the support
platform, and drive a couple of screws through the platform
into the stop.
2.
Set up the router.
 |
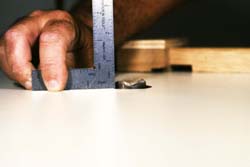
| Set your rule on a scrap of the
platform's deck to set the router's depth of cut. |
Use
a fixed-base router. If all you have is a plunge router,
treat it like a fixed-base router. Set the cutting depth
and lock it. If you do use the plunge feature, you are
almost sure to accidentally cut into the platform
itself, ruining both the jig and the workpiece.
Chuck
a large diameter (1 to 1 1/2 in.) mortising or bottom-cleaning
bit with a shank-mounted bearing in your router. A bit
with a 1/2-in. shank is best.
Adjust
the cutting depth. You can easily measure the distance
the bit extends past the baseplate, but it may be more
accurate to use a scrap of the platform material with
your small rule. This is especially true if you used
plywood for the platform. With the router unplugged,
lay a scrap of the platform material on the baseplate
next to the bit. Stand the ruler on the scrap and measure
the amount you want to cut.
Make
sure the bearing will contact the edge of the platform.
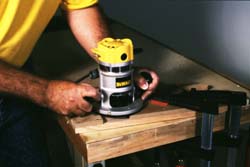
3.
Clamp the platform on the work.
 |
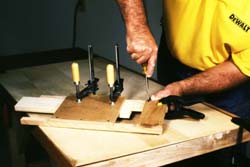
| Use
two clamps to secure the platform on the work, and
both to the workbench. |
Lay
the jig over the work, with the stop tight against the
end of the workpiece. The workpiece must be tight against
the jigs fence. Clamp the jig and the work to the workbench,
placing at least two clamps where they wont interfere
with the routers movement.
4.
Rout the first cheek.
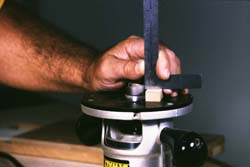
 |
| Make
the cut with the bits shank-mounted bearing riding
along the platform's edge. |
Set
the router on the tenoning platform, with the bit clear
of both the jig and the workpiece, but with the bearing
against the platform edge. Switch on the router, and
make the cut. The fence backs up the cut, so you dont
get tearout. You will cut the fence, of course, and
the tip of the stop as well; this is of little consequence.
The bearing will prevent you from cutting into either
the main or the support platform. Depending on the tenon
length and the bit diameter, you may be able to cut
the cheek in a single quick pass.
Switch
off the router, but wait until the bit stops spinning
before lifting the router. You dont want to inadvertently
nick the edge of the platform.
5.
Rout the second cheek.
Remove
the clamps and the tenoning platform. Turn the workpiece
over. Replace the platform, positioning it just as you
did for the first cut. Reclamp it. Make another cut,
just as you did the first.
6.
Fit the tenon to the mortise.
With
the cheeks cut, you can check how the tenon fits your
mortise. It wont fit it all the way in, because you
havent done the edges yet. But you will be able to
determine if the tenon is the right thickness.
Too
thin? Reduce the cutting depth slightly. (And start
with a new workpiece.)
Too
thick? Increase the cutting depth. (And cut your workpiece
again.)
Just
remember that you will be cutting both cheeks, so the
impact of any cut-depth change will be doubled. If your
tenon is 1/16 in. too thick, for example, increase the
cut depth only 1/32 in.
7.
Rout the edges.
To
cut the edges, you stand the work on edge, then balance
the platform on it while you apply the clamps. Because
you seldom cut just one tenon, a good procedure is to
cut the broad cheeks on all the tenons, then gang the
pieces together and do the edges. You can gang as many
pieces as will fit in the jig.
Once
the work and jig are clamped, set the router in place,
switch it on, and make the cut. Unclamp, remove the
jig, turn the work over, reclamp, and rout the second
edge.
Tenoning
Sled for the Router Table
Learn How to Make the Tenoning
Sled
 |
| With
the right jig, tenoning on the router table is a
snap. |
If
you have a router table, you can cut tenons even quicker.
Given a choice, this is the way I do it. You can set up
in two or three minutes, you dont have any layout to
do, and you can cut a typical tenon in four quick passes.
You
use the same sort of router bit (but you dont need
the shank-mounted bearing). Guide the work with an easy-to-make
sled thats nothing more than a short, stocky T-square.
The fence rides along the tabletop edge, so you get
a straight, consistently placed shoulder cut. The fence
holds the workpiece and backs up the cut, so you dont
get tearout. A work stop clamped to the fence sets the
tenon length.
Herestep-by-step,
is how I set up and cut a tenon.
 |
| Measure
from the edge of the cut in the fence to set the
stop position for your tenon. |
1.
Set up the router table.
Chuck the bitthe same type used with the tenoning platformin
the router, and set the bit elevation. Use a small rule
to measure the exposure of the cutting edge. Set the bit
a little under, so you can creep up on the just-right
setting through test cuts. (The just-right setting is
determined, of course, by fitting a test tenon in a mortise.)
 |
| The
work rides directly on the tabletop, so it is the
reference surface for setting the bit extension. |
2.
Set up the sled. Use your
small rule to set the stop next. Measure from the cut
made by the bit into the fence. If the tenon is to be
1 inch long, for example, align the 1-inch mark on the
rule over the edge of the cut. Slip the stop onto the
fence, and bring it against the end of the rule. Tighten
its clamp.
3.
Cut a test tenon. Turn
on the router and make a pass, cutting the first cheek
and shoulder. Roll the workpiece over. Make a pass,
cutting the second cheek and shoulder.
Check
the fit of this tenon in your mortise. Raise or lower
the bit, as necessary, to refine the fit. Cut another
test tenon and fit it to the mortise. When you've got
the settings right, cut the real work.
4.
Cut the real tenons. Work
and roll is the routine. With the workpiece in the tenoning
sled, its end against the stop, make a pass, cutting
the broad cheek. Pull the sled back, roll the workpiece
onto its edge, and make another pass. Two more quarter-rolls
and two more passes complete the tenon. If the tenons
length exceeds the diameter of the bit you are using,
you simply need to make additional passes with the workpiece
pulled away from the stop.
Obviously,
"plain vanilla" tenons, which have the same width of
shoulder all around, are the easiest to cut. An offset
tenon takes two setups. This approach will produce excellent
half-laps.
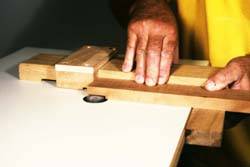 |
Begin your cut with the work
tight against the fence, its' end butted to the
stop. |
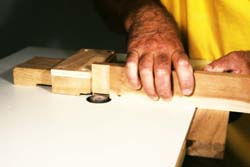 |
Turn your work into the edge
for the second cut. Keep it against both the fence
and the stop. |
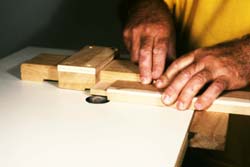 |
Roll the work a quarter turn
after each cut, completing the tenon in four passes. |
|
|