8.6.1 - Testing earth electrodes
The earth electrode, where used, is the
means of making contact with the general mass of earth.
Thus it must be tested to ensure that good contact is made.
A major consideration here is to ensure that the electrode
resistance is not so high that the voltage from earthed
metalwork to earth exceeds 50 V. Where an RCD is used, this
means that the result of multiplying the RCD operating current
(in amperes) by the electrode resistance (in ohms) does
not exceed 50 (volts). for normal dry locations, or 25 (volts)
for construction sites and agricultural premises.
If a 30 mA RCD is used, this allows a maximum
electrode resistance of 1,666 Ohms, although it is recommended
that earth electrode resistance should never be greater
than 200 Ohms. A
maximum value of 100 ohm is proposed in a draft amendment
of BS 7430, Code of Practice for Earthing.
There are several methods for measurement
of the earth electrode resistance. In all cases, the electrode
must be disconnected from the earthing system of the installation
before the tests commence.
Fig 8.13 - Measurement
of earth electrode resistance with a dedicated tester
1. -
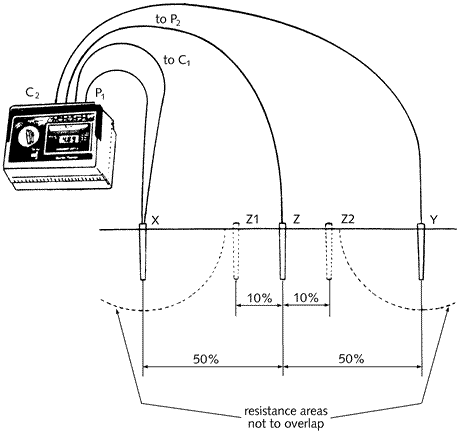
Using a dedicated earth resistance tester
The instrument is connected as shown in {Fig 8.13}
with terminals C1 and P1 being connected to the electrode
under test (X). To ensure that the resistance of the test
leads does not affect the result, separate leads should
be used for these connections. If the test lead resistance
is negligible, terminals Ci and P1 may be bridged at the
instrument and connected to the earth electrode with a single
lead.
Terminals C2 and P2 are connected to temporary
spikes which are driven into the ground, making a straight
line with the electrode under test. It is important that
the test spikes are far enough from each other and from
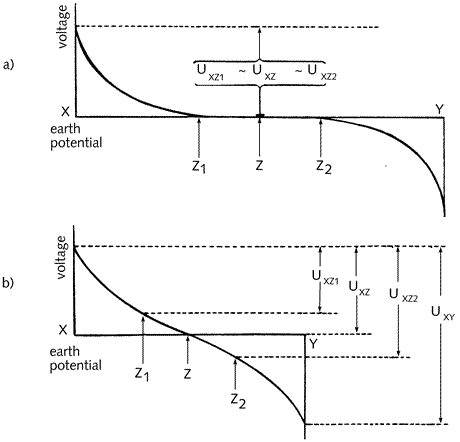
the electrode under test. If their resistance areas overlap,
the readings will differ for the reason indicated in {Fig
8.14}. Usually the distance from X to Y will be about 25
m, but this depends on the resistivity of the ground. To
ensure that resistance areas do not overlap, second and
third tests are made with the electrode Z 10% of the X to
Y distance nearer to, and then 10% further from, X. If the
three readings are substantially in agreement, this is the
resistance of the electrode under test. If not, test electrodes
Y and Z must be moved further from X and the tests repeated.
The tester provides an alternating output
to prevent electrolytic effects. If the resistance to earth
of the temporary spikes Y and Z is too high, a reduction
is likely if they are driven deeper or if they are watered.
Fig 8.14 - Effect of
overlapping resistance areas
a) resistance areas not overlapping
b) resistance areas overlapping
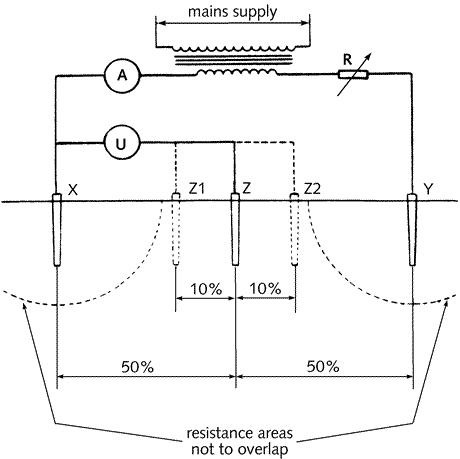
2. - Using a transformer, ammeter and voltmeter
The system is connected as shown in {Fig 8.15}. Current,
which can be adjusted by variation of the resistor R, is
passed through the electrode under test (X) to the general
mass of earth and hence to the test electrode Y. The voltmeter
connected from X to Z measures the volt drop from X to the
general mass of earth. The electrode resistance is calculated
from:
| voltmeter reading (V) |
| ammeter reading (A) |
As in the case of the dedicated
tester, the test electrode Z must again be moved and extra
readings taken to ensure that resistance areas do not overlap.
It is important that the voltmeter used has high resistance
(at least 200 Ohms /V) or its low resistance in parallel
with that of the electrode under test will give a false
result.
Fig 8.15 - Measurement
of earth electrode resistance
with a transformer, ammeter and voltmeter
3. - Using an earth fault loop impedance
tester
The tester is connected between the phase at the origin
of the installation and the earth electrode under test as
shown in {Fig 8.16}. The test is then carried out, the result
being taken as the electrode resistance although the resistance
of the protective system from the origin of the installation
to the furthest paint of the installation must be added
to it before its use to verify that the 50 V level is not
exceeded. If an RCD with a low operating current is used,
the protective system resistance is likely to be negligible
by comparison with the permissible electrode resistance.
Fig 8.16 - Measurement
of earth electrode resistance using an earth-fault loop
tester
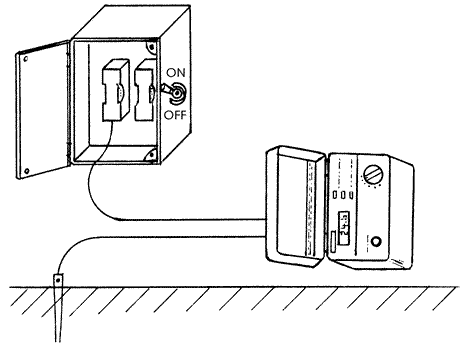
It is most important to ensure that earthing
leads and equipotential bonds are reconnected to the earth
electrode when testing is complete.